
Table of Contents
- Motherboard Reserialization Process
- Motherboard Enrollment Error
- Trouble Shooting
- EMR Film to New LCD Transfer Guide
Motherboard Reserialization Process
Follow along with our video tutorial below or use our step by step instructions!
- Power on the Chromebook.
- Press the Escape, Refresh, and Power Key's at the same time.
- Press Control + D, Press Enter. The device will restart.
- Once the device reboots, press Control + D.
- You will get a prompt explaining the device will be entering Developer Mode.
- After a short wait, the device will reboot. Press Control + D.
- The device will now be in Developer Mode. This can be confirmed by the blue text "Enable debugging features". As well as pressing Control + ALT + RH Arrow Key (Top Row) where the device will enter the terminal.
- To leave Developer Mode, press Refresh and Power key simultaneously. The screen will go dark momentarily.
- Once the device reboots press the Space Bar key, followed by the Enter key. The device will reboot, and will enter into standard user mode.
Step 1: Power on the Chromebook.
Step 2: Simultaneously press the following buttons:
Esc + ⟳ + Power Button
Step 3: The device will reboot to the Chrome OS recovery screen. Now press:
Ctrl + D
Step 4: The screen will go black for a second, and Chrome OS Verification will pop up. To start the transition into developer mode, again press the buttons below. (The transition takes about five minutes)
Ctrl + D
Step 5: When the transition is completed, the device will reboot back to the Chrome OS verification screen. You can either press the below buttons again, or do nothing. The device will make an audible beep, and reboot automatically into developer mode if you do nothing.
Ctrl + D
Step 6: You should now be in developer mode. To access the console, simultaneously press the following buttons:
Ctrl + Alt + RH Arrow Key
**Right Arrow Function Key (Top Row) not the actual arrow keys**
Step 7: Enter the username root (root has to be all lowercase to work and there will be no password line). If you accidentally mistype the username, press enter seven times when asked for a password. (*Note that a username box will pop up, but root will not work at the moment) Once back to the original username box, login with root.
Step 8: Most Chromebooks have some form of read/write protection. To test if you need to bother messing around with R/W protection on a given model, you should first try changing the S/N. To change the S/N type:
vpd-s “serial_number”=”[Your s/n]”.
**You must include the quotation marks in the command**
If you are working with a Dell model, you will also need to change the service tag. This is command starts the same as the above, but instead of “serial_number” it will read “service_tag”. Press Enter, then after a few seconds either the S/N will have changed or you will be given an error message along the lines of “flashromPartialWrite( ) error.” If you did not get an error message, skip to step 10; otherwise continue to the next step.
Step 9: This next section will cover how to disable the R/W for the three methods that were listed above. There are three forms: the battery being plugged in, a R/W screw (Example a), and pass through holes you have to jump (Example b).
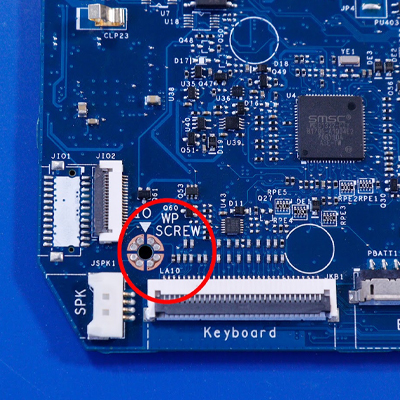
a. R/W Screw: Look for text reading “WP Screw” (or something similar to the image below). Remove the screw, and you should be able to now change the S/N.. If you are still unable to change the S/N, wipe the metal contacts with a rag to remove any potential metal shavings and try again. If that doesn’t work, the motherboard may be defective, and might require a replacement.
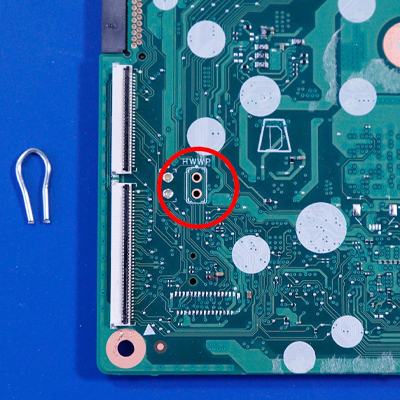
b. Passthrough Holes: Look for two holes inside a rectangle with the text “RWWP” (or something similar to the image below) above it. If the motherboard has a heatsink, make sure to check underneath it for the holes. We recommend using a non-insulated paper clip, cutting it down, and bending it like the one that is pictured in the image below. After inserting the paper clip, you should be able to to change the S/N.
c. Battery Connector: This is relatively straightforward; to get into dev mode, keep the battery plugged in. Once in dev mode, unplug the battery while the device is on. (You could try unplugging the battery while the device is off, but you won’t always be able to get back into dev mode with it unplugged) With the battery now unplugged, you should be able to to change the S/N.
Step 10: To verify the S/N has been changed and is correct, enter vpd -l. Also while verifying the S/N is correct make sure there is a line that starts with “stable_device_secret_DO_NOT_SHARE”. If no line exists run vpd -s “stable_device_secret_DO_NOT_SHARE”=$(openssl rand -hex 32). This will generate a new code and will allow you to enroll the device. If the S/N was mis-typed, you can do the vpd -s command again to change it.
Step 11: To exit dev mode, restart the device by simultaneously pressing ⟳ + Power Button. The device will reboot to Chrome OS Verification screen. Press Space Bar, then Enter to reenable verification. To confirm the S/N change worked, you can press Alt+V and it should pop up in the top right corner.
2023+ Disabling Read/Write Protect TI50
If you are having trouble disabling write protect on a newer device, there's a good chance you need to check for TI50 protection.
Run gsctool -a -I | grep AllowUnverifiedRo (The I is capitoal i). This will verify if the device has a Ti50 chip. If you get an output, it has a Ti50. If you get an error or no output, follow the usual steps.
On Chromebooks that were made in 2023 onward they are coming with a gen 2 CR50 chip called the Ti50. It is an all software based security chip. This chip can be used in conjunction with the normal CR50 chip, so there may still be a physical read/write protect like the battery, screw, or jumper as mentioned above. To disable the Ti50 follow the steps below. Once this chip is disabled it can not be re-enabled.
Warning: Attempting to software unlock some select unit’s Ti50 before disabling hardware read/write protection has the potential to brick your chromebook’s recovery system, disallowing you from entering dev mode at all or restoring the OS from a USB. Please use caution or reach out to customersupport@chromebookparts.com for further help.
The unit must be connected to a charger at all times, the battery must remain plugged in and charged until you are ready to attempt the final software unlock just before setting the serial number, unless otherwise stated. Please be wary of accidentally shorting your board, as it will be powered.
Step 1: Power on the Chromebook.
Step 2: Simultaneously press the following buttons: Esc + ⟳ + Power Button
Step 3: The device will reboot to the Chrome OS recovery screen. Now press: Ctrl + D
Step 4: The screen will go black for a second, and Chrome OS Verification will pop up. To start the transition into developer mode, again press theses buttons: Ctrl + D (The transition takes about five minutes)
Step 5: When the transition is completed, the device will reboot back to the Chrome OS verification screen. You can either press the these buttons again: Ctrl + D , or do nothing. The device will make an audible beep, and reboot automatically into developer mode if you do nothing.
Step 6: You should now be in developer mode. To access the console, simultaneously press the following buttons: Ctrl + Alt + Right Arrow Right arrow function key (top row) not the actual actual arrow keys
Step 7: Enter the username root (root has to be all lowercase to work and there will be no password line). If you accidentally mistype the username, press enter seven times when asked for a password. (*Note that a username box will pop up, but root will not work at the moment) Once back to the original username box, login with root.
Step 8: Run flashrom —wp-disable. While this is only necessary on half of observed TI50 devices, it doesn't hurt to run. It will give you an error no matter what, but the change will be applied during the next step.
Step 9: Run gsctool -a -o . The device may restart back into normal mode and you will have to get back into dev mode to run this command again.
Step 10: The device will ask you to press the "pp" button. Double tap the power button. It will ask you to do this five to eight times in 30-60 second intervals. It will look like it is frozen during those 30 seconds. The device will most likely reboot again into normal (verified) mode.
Step 11: The Follow the initial steps to get back into dev mode.
Step 12: Once back in dev mode, run gsctool -a -o again. It should not cause anything to happen, and return with no issues. If it causes another "pp" minigame, your device powered off during the initial reset, please ensure your battery is charged and plugged in.
Step 13: Run flashroom —wp-disable again.
Step 14: Type in gsctool -a -I AllowUnverifiedRo:always. If at this point you get an error saying “could not find long opt table index for 63”, you most likely need to temporarily disable hardware write protection. Search the motherboard for jumper holes, WR screws, and unplug the battery, then try this command again. This is only necessary for certain TI50 units.
Step 15: Run gsctool -a --reboot. This will restart the device in recovery mode, but should reset the GSC chip applying the setting, allowing you to go back into dev mode and set your serial number
Step 16: Disable all forms of hardware write protection. Battery, WP screw, jumpers, ect.
Step 17: Go back into the dev console for the third time and run flashrom —wp-disable again.
Step 18: You can attempt to update the S/N now. If you still get a write protection error, attempt to run gsctool -a -o again. If all is well, it should not ask you to press the “pp” button again, and it should return normally. If it does engage, repeat from the relevant step down. Attempt to reserialize once more.
Step 19: If you are still having issues or encountering errors. Reach out to customersupport@chromebookparts.com
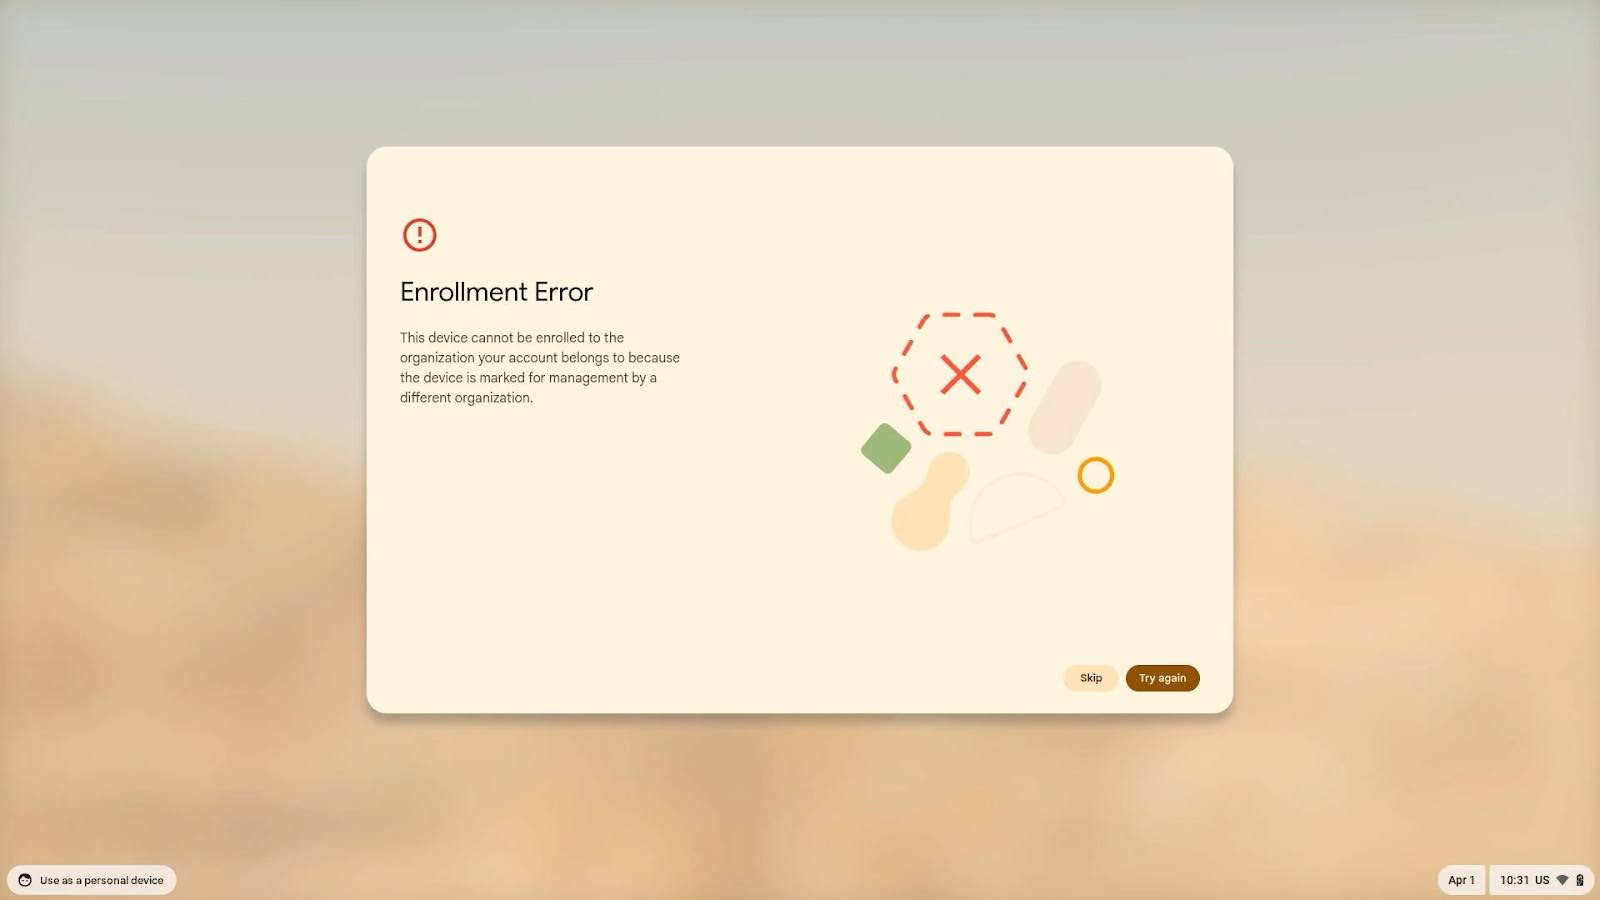
Motherboard Enrollment Error
If you have received the following error message: “Enrollment Error This device cannot be enrolled to the organization your account belongs to because the device is marked for management by a different organization”, then follow the steps below.
Step 1: Login into your Chromebook
Step 2: Once logged in, open the toolbar settings, then click on the gear icon to open the main settings menu.
Step 3: In the main settings menu scroll to the bottom, click advanced settings, then scroll to the bottom again. At the bottom there should be a button called Powerwash. Click on the powerwash button. The device will restart automatically.
Step 4: After the device restarts it goes back to the login screen (you do not need to login again). Give it a moment (depending on the Chromebook this could take up to 10 seconds) and a prompt to ‘Reset this Chromebook’ will appear. Click on the powerwash button and a second prompt will appear asking you to confirm you want to powerwash the device. Click the continue button. The device will restart again.
Step 5: Device will boot to a screen stating “Powerwash in progress…” (this will take about 5-10 seconds). The device will then restart again.
Step 6: Try to enroll the device again.
Step 7: If you are able to successfully enroll the device, you are good to go!
Step 8: If you are still receiving the same enrollment message, enter into developer mode -- If you are unsure on how to do so, follow steps 1-7 listed on the ‘Motherboard Reserialization Process’ above.
Step 9: After you have logged into developer mode (you can type in clear to clean up the screen if you want), type in “stable_device_secret_DO_NOT_SHARE”=$(openssl rand -hex 32) . This will generate a new enrollment key, which should allow you to enroll the device into your domain. If you get an error message along the lines of “flashromPartialWrite( ) error.”, follow step 9 listed on the ‘Motherboard Reserialization Process’ above to disable read/write protection.
Step 10: To exit dev mode, restart the device by simultaneously pressing ⟳ + Power Button. The device will reboot to the Chrome OS Verification screen. Press Space Bar, then Enter to re-enable verification.
Step 11: Try to enroll the device again.
Step 12: If you are still receiving an enrollment error, please contact us at customersupport@chromebookparts.com for additional assistance.
If you are unable to enroll the device please try these steps before contacting a representative:
Step 1: Connect the device to the internet and let it update.
Step 2: Log in fully and powerwash the device.
Step 3: Go back into developer mode and run this command: vpd -s “stable_device_secret_DO_NOT_SHARE”=$(openssl rand -hex 32).
ERM Film to New LCD Transfer Guide
If you have any questions or concerns with this process contact us at: customersupport@chromebookparts.com and one of our dedicated customer service reps will answer any questions!
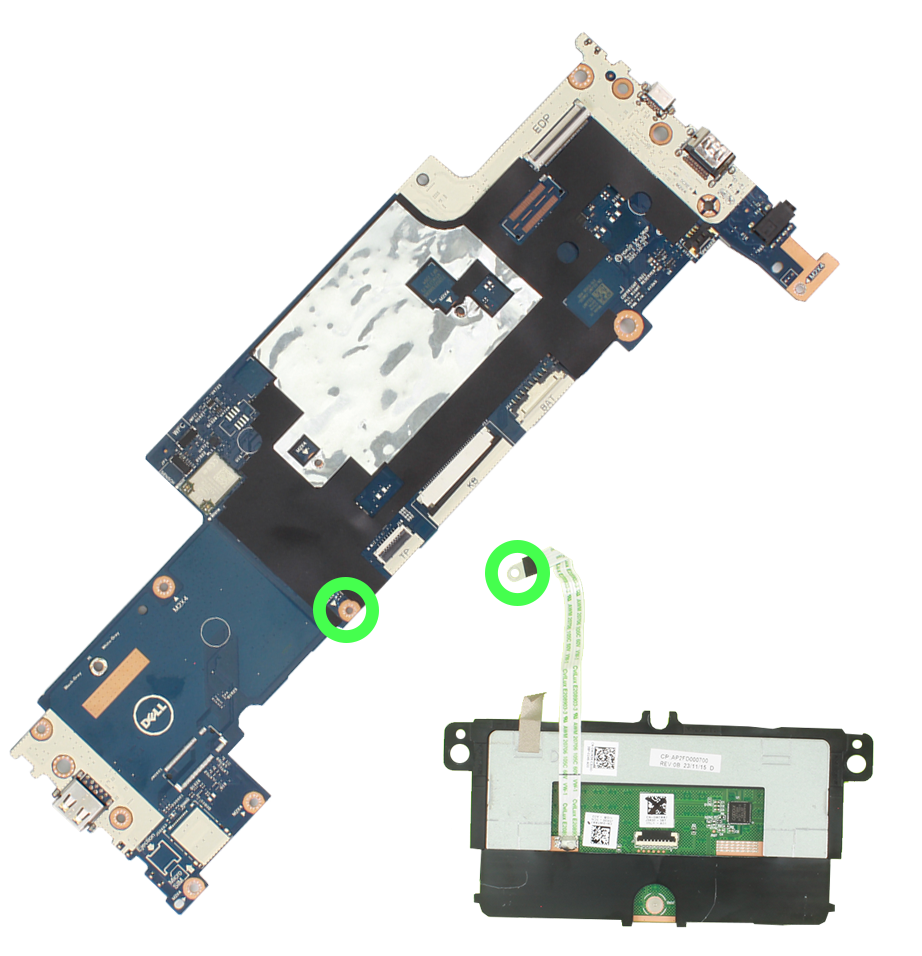
Dell 3110 08/64 2-in-1 Grounding Cable Connection
To connect the grounding cable on the touchpad to the motherboard, remove the screw from the GREEN CIRCLE location on the motherboard (See image), place the end of the cable over the hole, and replace the screw.